
This Is the Absolute Best Way to Start Seeds for Your Garden (And Get Your Plants to Grow Strong and Healthier)
More sustainable, better results… why isn’t everyone doing it?

Kristin Guy
Spring is upon us and so is the thrill of getting our gardens back in action! Whether you’ve already started a tray of seeds indoors or you’re just about to get things growing, we’re here to encourage you to try things a little bit differently this year. If you’ve ever been prone to hoarding a few (okay, dozens) of leftover plastic nursery pots, you know that they can take up a lot of space. Seed trays also require too much storage, not to mention that they ultimately break and fill landfills with unnecessary waste.
What if I told you to ditch the plastic and in turn sprout superior seedlings? Yes, that’s right. There’s a better way to start seeds… enter soil-blocking.
What Is Soil-Blocking?
Soil-blocking is nothing new; in fact, the practice dates back at least 2,000 years to when the Aztecs built the so-called “Floating Gardens” of Mexico City where long strips of land were surrounded with water to grow plants and vegetables. This incredibly successful method of cultivating plants without the use of containers continues today using a product created and improved over the last 100 years: the soil blocker.
Kristin Guy
More Videos From Sunset
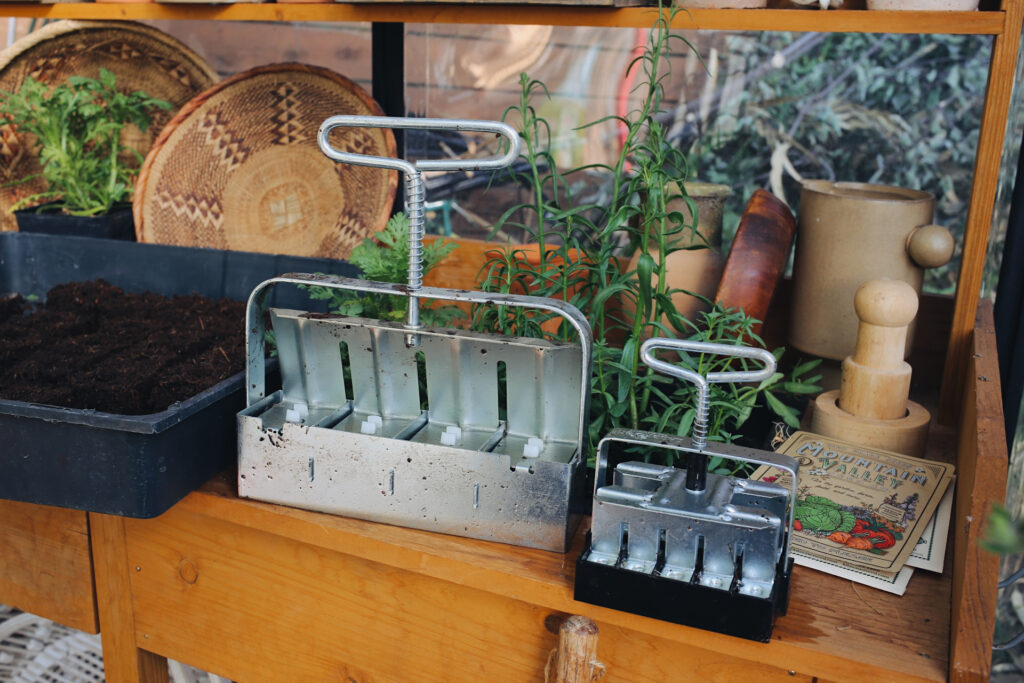
The soil blocker is a metal spring-loaded tool that forms and compresses cubes of specialized soil mixtures. By eliminating plastic pots, the soil has increased oxygen flow from all sides, allowing roots to grow vigorously without confinement and ultimately producing plants with superior root health. Not only do these seedlings resist becoming root-bound, they have far less transplant shock compared to other pot-grown starts.
Less waste and healthier plants… what are you waiting for?! Here’s how to grow square this spring.

Kristin Guy
How to Start Soil-Blocking
Supplies Needed
Soil-Blocking System: These metal blockers come in a number of sizes, typically creating 3/4-inch to 4-inch square blocks. The beauty of these is that they often work together, in the same fashion you would “up pot” larger seedlings (think tomatoes and peppers) before transplanting, you can insert smaller soil blocks into larger ones allowing for more mature growth before they hit the garden. What size you choose is entirely up to how you want to grow and the amount of space you have to store equipment. I love this all-in-one system, but if you don’t want to fully invest until you get the hang of things, I recommend starting with a 2-inch blocker and then expanding your set for future growing seasons.

Courtesy of Amazon
Nursery Flat or Growing Tray: Your blocks need to be given a home where they can sit undisturbed until transplant day. A nursery tray with a lip is ideal for bottom watering, even better if you can poke holes so excess water can eventually drain out. Some people prefer a dipping method for watering—simply use one perforated nursery tray for soil cubes and then dunk into a larger solid-bottom tray that can hold water. What works for you all depends on the amount of growing space you have available.

The Low-Water Gardening Guide
If you've been looking for new ways to save water in your garden, or want to redo it entirely, let this be the year you make it happen. Our 8-week newsletter series can show you how. Click the button below to subscribe!
Coco Coir: Pass on the peat moss please! We’re depleting natural resources and it’s time to make the swap to coconut coir. Not only is it a more sustainable option, it requires less water for full hydration and can even encourage beneficial bacteria. We love using this in house plant soil mixes as well!
Compost: Whether you’ve got enough from your own bin, or need to pick up a bag at the nursery, compost is a key ingredient for your plants’ health because it promotes growth (hello, natural fertilizer), retains water, and discourages disease.
Rock Sulfate: One of the most widely used organic fertilizers, this natural ingredient adds phosphorus and calcium into the mix which promotes healthy plant growth as well as healthy roots and flowering.
Powdered Kelp Meal: Another all-natural powerhouse, this powder increases natural plant growth hormones such as auxins, cytokines, and gibberellins (aka: powerful plant hormones). Think of it as your smoothie supplement for seedlings.

Kristin Guy
Soil-Block Recipe
There are many different recipes out there, even a few pre-mixed bags available, but we’ve picked a simple one to try first—however, we encourage you to experiment and find the blend that works best for your climate and growing conditions. We call this the non-recipe because personal modifications are most definitely needed. Depending on if you’re growing indoors, in a greenhouse, or out on a potting bench, your blocks will respond differently to the temperature and humidity levels. Be patient, add, adjust, and you’ll find your growing groove!
Ingredients
8 cups coco coir
2 cups compost
2 tbsp rock sulfate
2 tbsp kelp meal
3-4 cups water
Directions
Strain coco coir and compost through a fine mesh screen to eliminate clumps. Put all your ingredients together in a large tub and mix well. Add water, one cup at a time, and mix as you go. This should ultimately have the consistency of a damp sponge, not overly wet and dripping. You’ll know when you have achieved perfect consistency when the mix keeps its shape (test by making a ball).
Too wet and runny? Add more coco coir and compost. Not sticking together? Add a little more water. You’ll know when your custom mix is right—just remember it’s an imperfect dance that might need tweaking depending on your specific weather and organic materials used.

Kristin Guy
How to Create Your Soil Blocks
1. Make Blocks: Using your soil-blocking tool, press into the seed-starting mixture making sure each of the tool’s compartments are completely filled and packed in. Dispense your blocks onto a nursery tray, which will be their growing spot until transplant day. If blocks are falling apart, you’ll need to revisit your mixture and make a few changes as noted above.
2. Start Seeds: Each soil block will have a small indentation on the top; depending on the type of seed you’re starting, you can simply place the seed on top or sow to a depth twice the seed size. Use a chopstick or dibber to gently create a small hole, sowing no more than two seeds per block.

Kristin Guy
3. Water: Bottom-watering is your friend! Some people have constructed multi-tray systems to carefully dip blocks into water, others have punched drainage holes into the single nursery tray. However you do it, the key is to not water from overhead or have blocks sitting in standing water—both conditions can cause blocks to fall apart. If dryness on the top of your blocks becomes an issue, you can gently water overhead with a spray mister once the seed has fully germinated. If algae becomes an issue from too much dampness, wait until the top of the block dries out before the next watering.

Kristin Guy
4. Pot up and Transplant: If certain plants need to be “potted up” before transplanting into the garden, there are soil blocking systems that allow for micro blocks to be embedded within larger 2- and 4-inch blocks. Simply place a provided square punch piece into your larger blocking tool which will create the space for you to drop in your smaller seedling square. It couldn’t be more simple.
Before transplant day, it’s recommended to harden off plants as you typically would with those in containers. The key is to keep sunlight and temperature in mind as your blocks might dry out faster when exposed to new conditions. Use a spade or hori hori knife to create a pocket slightly larger than your block and insert into your garden beds or directly into the ground.
Now stand back, smile, and know that you just gave that seedling a sustainable and strong start to a beautiful growing season ahead!
Read the Current Issue Here!
Get one year of Sunset—and all kinds of bonuses—for just $29.95. Subscribe now!
