Like a sprinkler is for the kiddos, a garden-hose shower is for adult cooling off
Photo by Thomas J. Story
Dual purpose: Runoff from the shower helps water your yard.
Written bySunset
May 12, 2010
Share this story
This weekend project has three basic parts: two wing walls and a center pole with the plumbing attached. All materials are available at the Home Depot.
Time: One weekend (4 hours of labor, plus drying time for sealer)
Difficulty: 3 (on a scale of 1–10; requires modest woodworking skills)
Two 26- by 72-inch panels of corrugated metal roofing
Four 8-foot-long redwood 2-by-4s
Two 10-foot-long redwood 2-by-4s
One 8-foot-long peeler-core log
Forty 3½-inch deck screws
Eighteen 1¼-inch self-tapping metal screws
1 quart water-based wood sealer
Shower materials:
1 roll nylon plumbing tape
1 showerhead
1 shower arm
Two 1/2-inch elbows
Two 36-inch-long 1/2-diameter pipes, threaded at each end
One 1/2-inch threaded gate-valve faucet
One 8-inch-long 1/2-diameter pipe
One 3/4- by 12-inch hose coupling called a “female hose to female swivel”
2 C-shaped pipe hangers
1 garden hose connected to an exterior water spigot
Instructions:
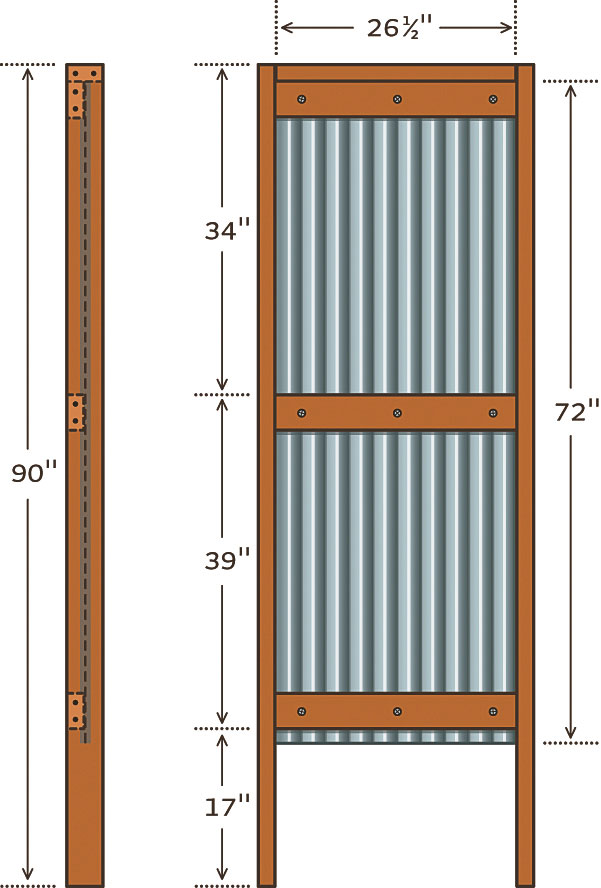
Each wing wall has a 6-foot-long corrugated metal roof panel that’s screwed to a frame made of 2-by-4 lumber.
Each frame requires two 90-inch side pieces and four 26½-inch crosspieces.
We used redwood for the frames, which was protected with a water-based sealer prior to attaching the panels. A less expensive option is pressure-treated lumber.
Panel options include clear, frosted, or colored fiberglass roofing, aluminum flashing, or colorful oil or acrylic cloth.
1. Each wing wall has a 6-foot-long corrugated metal roof panel that’s screwed to a frame made of 2-by-4 lumber. Each frame requires two 90-inch side pieces and four 26½-inch crosspieces. Note: We used redwood for the frames, which was protected with a water-based sealer prior to attaching the panels.
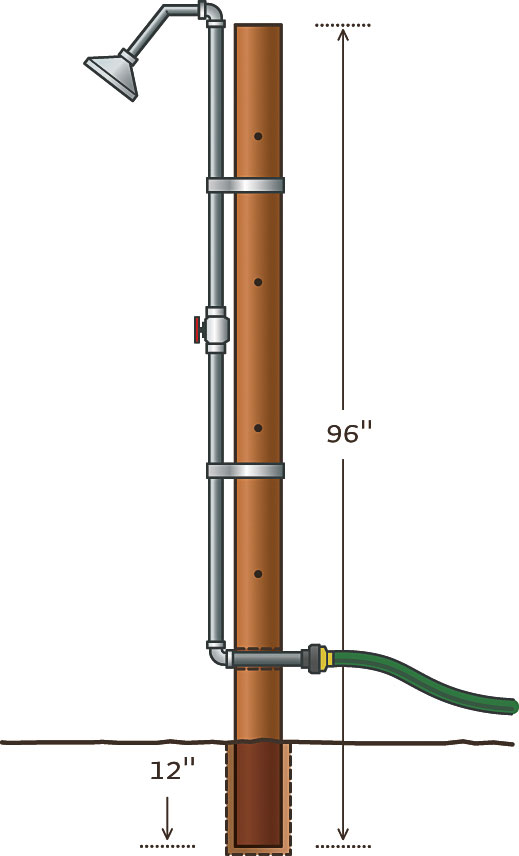
2. The wing walls attach to one 8-foot-long pressure-treated peeler-core log outfitted with 1/2-inch galvanized metal piping, a faucet, and a showerhead.
Lay out and assemble the galvanized piping using nylon plumbing tape at each joint, but do not add the hose coupling at the end of the 8-inch bottom pipe yet.
The wing walls attach to one 8-foot-long pressure-treated peeler-core log outfitted with 1/2-inch galvanized metal piping, a faucet, and a showerhead.
This showers uses only cold-water lines from a garden hose and is not intended for long showers, so we have only built simple drainage.
Water will flow into the gravel and soil underfoot, watering your plants while it cools you off.
Center and drill a 3/4-inch-diameter hole through the pole 78 inches from the top. Slip the short leg of pipe through the hole, then center the pipe and faucet on the pole and secure it with C-shaped pipe hangers. Add the hose coupling and then hook it up to the garden hose to pressure-test for leaks.
3. Find a location for the shower. We placed it on a gravel pad to help drainage and also added concrete pavers to stand on.
Dig a 12-inch-deep hole for the center shower pole. Place it so the faucet handle will project outward at 45° between the wing walls. Set the wing walls at square to each other and attach them to the pole (with three 12-inch screws each) so their legs only go 6 inches into the ground. Check verticality with a level before tamping and compacting soil.
Other choices
Frame: For appearance, we chose redwood decking with few knots. A less expensive (but less attractive) choice would be pressure-treated lumber. Painting the frame is another option.
Panels: We used panels of corrugated galvanized metal, but you could instead purchase clear, frosted, or colored panels of fiberglass roofing (note: they are not always available precut in 6-foot lengths). Aluminum flashing might be a nice substitute, and oil cloth or acrylic cloth might work for a shot of color too.
Lay out and assemble the galvanized piping (see materials list) using nylon plumbing tape at each joint. Do not add the hose coupling at the end of the 8-inch bottom pipe yet.
Center and drill a 3/4-inch-diameter hole through the pole 78 inches from the top.
Slip the short leg of pipe through the hole, then center the pipe and faucet on the pole and secure it with C-shaped pipe hangers.
Add the hose coupling and then hook it up to the garden hose. Pressure-test for leaks.
Plumbing pipe: We used the galvanized pipes because they were precut and had a nice appearance. You could cut the cost of the piping by using PVC, but it would have to be painted to be less visible.
Drainage: Since this uses only cold-water lines from a garden hose, it is not intended for long showers, so we have only built simple drainage—water will flow into the gravel and soil underfoot.
Design: Peter O. Whiteley, Sunset contributing editor


