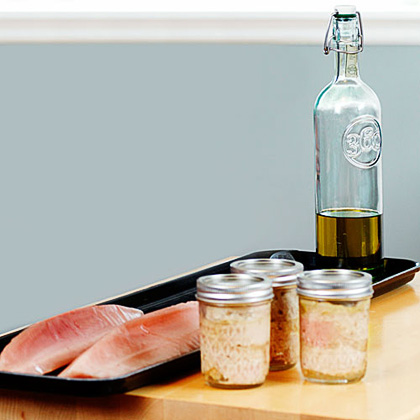
su-Freshly Canned Tuna
Sunset
Total Time 3 hrs 30 mins
AuthorJeff Pratuch, Portland, OR

Jeff Pratuch, a banker in Portland, Oregon, loves to fish for albacore tuna, and he learned to preserve a big catch by canning it. It’s surprisingly easy and very fresh tasting compared to ordinary canned tuna.

How to Make It

Step 1
1

Slice tuna crosswise into 1/2-in. medallions.

Step 2
2

Drizzle 1 tsp. olive oil into each jar.

Step 3
3

Layer tuna medallions cut side down into each jar, sprinkling each layer with about 1/4 tsp. salt and a sprinkle of pepper, leaving 1 in. headspace between tuna and top of jar. Trim tuna to fit if necessary and use trimmings to fill any spaces. Slowly turn jar while moving a thin plastic knife up and down around inner edge of jar to release air bubbles.

Step 4
4

Wipe clean rims of filled jars using damp paper towels. Top with lid and screw on ring just to close; do not tighten.

Step 5
5

Assemble pressure canner according to manufacturer's instructions and fill with boiling water (usually 3 qts.). Add rack and set filled jars on rack. Water should come to just below rings on jar tops.

Step 6
6

Close pressure cooker and set over high heat until steam starts to flow from vent pipe. Let flow 10 minutes, then adjust heat to maintain a steady, moderate flow of steam to begin the buildup of pressure. Start timing on a weighted-gauge canner when the weight begins to rock, or on a dial-gauge canner when the dial reads 11 lbs. of pressure. Tuna should cook for 100 minutes. Regulate heat as necessary to keep weight rocking steadily and evenly or the dial reading between 11 and 13 lbs.

Step 7
7

Remove canner from heat and let stand until pressure is completely reduced and canner is cool enough to open (follow manufacturer's instructions).

Step 8
8

Lift jars from canner using tongs and set on a towel or rack to cool. Rings may be loose, but you don't need to tighten them (the lids are forming the seal). After 12 hours, test the seal on each jar by pressing in the center of the lid; if it pops up, it hasn't sealed properly and should be refrigerated and eaten within a week.

Step 9
9

* You can double-deck the half-pints (following the canner manufacturer's instructions) or use pint jars (cook for the same amount of time as for half-pint jars) if you are canning more tuna.

Step 10
10

Note: Nutritional analysis is per serving.

Ingredients

  Equipment
  16-qt. dial-gauge or weighted-gauge pressure canner
 8 half-pint wide-mouth canning jars* with lids and rings, freshly washed on your dishwasher's hottest setting
  Tongs or jar lifter
  Tuna
 2 pounds 10 oz. boneless skinless albacore tuna loins (thawed if purchased frozen)
 8 teaspoons extra-virgin olive oil
  About 4 tsp. kosher salt
  About 2 tsp. freshly ground black pepper

Directions

Step 1
1

Slice tuna crosswise into 1/2-in. medallions.

Step 2
2

Drizzle 1 tsp. olive oil into each jar.

Step 3
3

Layer tuna medallions cut side down into each jar, sprinkling each layer with about 1/4 tsp. salt and a sprinkle of pepper, leaving 1 in. headspace between tuna and top of jar. Trim tuna to fit if necessary and use trimmings to fill any spaces. Slowly turn jar while moving a thin plastic knife up and down around inner edge of jar to release air bubbles.

Step 4
4

Wipe clean rims of filled jars using damp paper towels. Top with lid and screw on ring just to close; do not tighten.

Step 5
5

Assemble pressure canner according to manufacturer's instructions and fill with boiling water (usually 3 qts.). Add rack and set filled jars on rack. Water should come to just below rings on jar tops.

Step 6
6

Close pressure cooker and set over high heat until steam starts to flow from vent pipe. Let flow 10 minutes, then adjust heat to maintain a steady, moderate flow of steam to begin the buildup of pressure. Start timing on a weighted-gauge canner when the weight begins to rock, or on a dial-gauge canner when the dial reads 11 lbs. of pressure. Tuna should cook for 100 minutes. Regulate heat as necessary to keep weight rocking steadily and evenly or the dial reading between 11 and 13 lbs.

Step 7
7

Remove canner from heat and let stand until pressure is completely reduced and canner is cool enough to open (follow manufacturer's instructions).

Step 8
8

Lift jars from canner using tongs and set on a towel or rack to cool. Rings may be loose, but you don't need to tighten them (the lids are forming the seal). After 12 hours, test the seal on each jar by pressing in the center of the lid; if it pops up, it hasn't sealed properly and should be refrigerated and eaten within a week.

Step 9
9

* You can double-deck the half-pints (following the canner manufacturer's instructions) or use pint jars (cook for the same amount of time as for half-pint jars) if you are canning more tuna.

Step 10
10

Note: Nutritional analysis is per serving.

Freshly Canned Tuna