
Stick a cork in it—sealing our Chardonnay’s fate
Cork. The final frontier for our Chardonnay (and, sometime in January, our equally beloved Syrah too). Last week, I told you how Team W…
Cork. The final frontier for our Chardonnay (and, sometime in January, our equally beloved Syrah too).
 Last week, I told you how Team Wine sterilized dozens and dozens of Burgundy-style bottles with bottle wash, stuck them on a spiky plastic tree to dry, then started a siphon and began filling those bottles with wine—click to see the full details and even videos of how we set up and started a siphon.
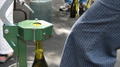
Or just skip ahead and watch the below video, in which Sunset’s managing editor, Team Wine member Alan Phinney, uses a spring-loaded bottling rod attached to a siphoning tube to fill a bottle with Chardonnay. Toward the end of the video, you’ll get a glimpse of our creaky old floor corker as Team Wine’s Sara Jamison loads it up with a sterilized cork and places a full bottle on its spring-loaded platform.
On the recommendation of the experts at our local winemaking shop, MoreWine in Los Altos, California, we switched our cork choice from “First” quality 1 3/4-inch-long #9 corks to “Grade 3” ($36 for 100 corks). Why the quality switch? Well, white wines don’t keep for decades, and therefore we don’t plan to try cellaring them. So there was no need to pay for higher-quality corks—if we can afford them, we’ll use them next month on our Syrah, whose inky, fruity, bacony yumminess we will cellar and lusciously savor for years.
The 1 3/4-inch length is one of the two standard options (the other being the slightly shorter 1 1/2-inch length) for a traditional 750-ml. bottle. We used #9 (a sizing guideline that refers to the cork’s diameter and its resiliency under compression) because it’s the best width for sealing a bottle with a floor corker. Here’s a handy chart (click that link, then scroll all the way down) that shows different cork sizes and their recommended uses (like a #8 if you’re using a hand corker, and a #7 if you’re bottling a split).
Our all-natural corks were punched from cork trees in Portugal. We didn’t choose plastic or “agglomerated” (bits of cork pressed together and bound with an epoxy). We got the good stuff.
But even though they’re natural, corks still need sterilizing before being put in contact with wine (which remains alive, even when bottled). So Sara J. and I prepped another sanitizing solution of water and potassium metabisulfite (the exact equation is in our free downloadable how-to guide) in a nonreactive stainless steel bowl. To keep the corks from bobbing up in this solution (and to keep us from having to constantly jab them down to ensure sterilization) we nestled a smaller nonreactive bowl on top of the bowl of corks, then only poked them every 5 minutes or so.
After 20 minutes of being dunked, the corks were ready for use. Instead of draining the solution and risking some bug or dust latching onto the corks as they dried, we left them bathing till we needed them, and we placed the bowl at the base of the corker for ease of access.
A floor corker is amazingly simple and complex at the same time. It’s physics and mechanics in action. You simply place a full bottle on the spring-loaded platform, place a sanitized cork in the jaws of the “compression chamber” or iris, then brace the corker with your foot (if it’s a rickety one like ours) and use your hands to pull down the handle. In one fluid motion, the cork gets squeezed on four sides and a metal rod comes down to plunge the compressed cork into the bottle. Check it out in the video below.
Once in a bottle, the cork has just enough room to expand in the bottle neck, creating a tight seal and keeping the wine in and oxygen out. Because any SO2 you added during the winemaking process is still bubbling out of the wine at this point, and because wine is a living thing that needs time to adjust to its new environment, you’ll want to place the bottles upright (cork side up) in the case for 24 to 48 hours. After the bottles de-gas and adapt, flip them upside down in the case or store them horizontally, either in a wine rack or simply by tilting a full case of bottles on its side—choose whichever method you’d like as long as it ensures that the wine is staying in contact with the cork (which could wither if you leave it hanging high and dry above the wine’s slight headspace, which you’ll notice when a bottle is standing upright).
Now your bottles are ready to be labeled and shared with friends (or hoarded—you know who you are). But don’t drink them right away—beware bottle-shock.
I’ll post details on how to label and the truth (it’s not a myth!) about bottle-shock soon. In the meantime, we’re gathering gift ideas for winemakers, wannabe winemakers, and wine fans in general. Cruise by next week to see what we unearth. And by all means, please leave your own ideas in our Comments section!
Last week, I told you how Team Wine sterilized dozens and dozens of Burgundy-style bottles with bottle wash, stuck them on a spiky plastic tree to dry, then started a siphon and began filling those bottles with wine—click to see the full details and even videos of how we set up and started a siphon.
Or just skip ahead and watch the below video, in which Sunset’s managing editor, Team Wine member Alan Phinney, uses a spring-loaded bottling rod attached to a siphoning tube to fill a bottle with Chardonnay. Toward the end of the video, you’ll get a glimpse of our creaky old floor corker as Team Wine’s Sara Jamison loads it up with a sterilized cork and places a full bottle on its spring-loaded platform.
On the recommendation of the experts at our local winemaking shop, MoreWine in Los Altos, California, we switched our cork choice from “First” quality 1 3/4-inch-long #9 corks to “Grade 3” ($36 for 100 corks). Why the quality switch? Well, white wines don’t keep for decades, and therefore we don’t plan to try cellaring them. So there was no need to pay for higher-quality corks—if we can afford them, we’ll use them next month on our Syrah, whose inky, fruity, bacony yumminess we will cellar and lusciously savor for years.
The 1 3/4-inch length is one of the two standard options (the other being the slightly shorter 1 1/2-inch length) for a traditional 750-ml. bottle. We used #9 (a sizing guideline that refers to the cork’s diameter and its resiliency under compression) because it’s the best width for sealing a bottle with a floor corker. Here’s a handy chart (click that link, then scroll all the way down) that shows different cork sizes and their recommended uses (like a #8 if you’re using a hand corker, and a #7 if you’re bottling a split).
Our all-natural corks were punched from cork trees in Portugal. We didn’t choose plastic or “agglomerated” (bits of cork pressed together and bound with an epoxy). We got the good stuff.
But even though they’re natural, corks still need sterilizing before being put in contact with wine (which remains alive, even when bottled). So Sara J. and I prepped another sanitizing solution of water and potassium metabisulfite (the exact equation is in our free downloadable how-to guide) in a nonreactive stainless steel bowl. To keep the corks from bobbing up in this solution (and to keep us from having to constantly jab them down to ensure sterilization) we nestled a smaller nonreactive bowl on top of the bowl of corks, then only poked them every 5 minutes or so.
After 20 minutes of being dunked, the corks were ready for use. Instead of draining the solution and risking some bug or dust latching onto the corks as they dried, we left them bathing till we needed them, and we placed the bowl at the base of the corker for ease of access.
A floor corker is amazingly simple and complex at the same time. It’s physics and mechanics in action. You simply place a full bottle on the spring-loaded platform, place a sanitized cork in the jaws of the “compression chamber” or iris, then brace the corker with your foot (if it’s a rickety one like ours) and use your hands to pull down the handle. In one fluid motion, the cork gets squeezed on four sides and a metal rod comes down to plunge the compressed cork into the bottle. Check it out in the video below.
Once in a bottle, the cork has just enough room to expand in the bottle neck, creating a tight seal and keeping the wine in and oxygen out. Because any SO2 you added during the winemaking process is still bubbling out of the wine at this point, and because wine is a living thing that needs time to adjust to its new environment, you’ll want to place the bottles upright (cork side up) in the case for 24 to 48 hours. After the bottles de-gas and adapt, flip them upside down in the case or store them horizontally, either in a wine rack or simply by tilting a full case of bottles on its side—choose whichever method you’d like as long as it ensures that the wine is staying in contact with the cork (which could wither if you leave it hanging high and dry above the wine’s slight headspace, which you’ll notice when a bottle is standing upright).
Now your bottles are ready to be labeled and shared with friends (or hoarded—you know who you are). But don’t drink them right away—beware bottle-shock.
I’ll post details on how to label and the truth (it’s not a myth!) about bottle-shock soon. In the meantime, we’re gathering gift ideas for winemakers, wannabe winemakers, and wine fans in general. Cruise by next week to see what we unearth. And by all means, please leave your own ideas in our Comments section!
 Last week, I told you how Team Wine sterilized dozens and dozens of Burgundy-style bottles with bottle wash, stuck them on a spiky plastic tree to dry, then started a siphon and began filling those bottles with wine—click to see the full details and even videos of how we set up and started a siphon.
Or just skip ahead and watch the below video, in which Sunset’s managing editor, Team Wine member Alan Phinney, uses a spring-loaded bottling rod attached to a siphoning tube to fill a bottle with Chardonnay. Toward the end of the video, you’ll get a glimpse of our creaky old floor corker as Team Wine’s Sara Jamison loads it up with a sterilized cork and places a full bottle on its spring-loaded platform.
On the recommendation of the experts at our local winemaking shop, MoreWine in Los Altos, California, we switched our cork choice from “First” quality 1 3/4-inch-long #9 corks to “Grade 3” ($36 for 100 corks). Why the quality switch? Well, white wines don’t keep for decades, and therefore we don’t plan to try cellaring them. So there was no need to pay for higher-quality corks—if we can afford them, we’ll use them next month on our Syrah, whose inky, fruity, bacony yumminess we will cellar and lusciously savor for years.
The 1 3/4-inch length is one of the two standard options (the other being the slightly shorter 1 1/2-inch length) for a traditional 750-ml. bottle. We used #9 (a sizing guideline that refers to the cork’s diameter and its resiliency under compression) because it’s the best width for sealing a bottle with a floor corker. Here’s a handy chart (click that link, then scroll all the way down) that shows different cork sizes and their recommended uses (like a #8 if you’re using a hand corker, and a #7 if you’re bottling a split).
Our all-natural corks were punched from cork trees in Portugal. We didn’t choose plastic or “agglomerated” (bits of cork pressed together and bound with an epoxy). We got the good stuff.
But even though they’re natural, corks still need sterilizing before being put in contact with wine (which remains alive, even when bottled). So Sara J. and I prepped another sanitizing solution of water and potassium metabisulfite (the exact equation is in our free downloadable how-to guide) in a nonreactive stainless steel bowl. To keep the corks from bobbing up in this solution (and to keep us from having to constantly jab them down to ensure sterilization) we nestled a smaller nonreactive bowl on top of the bowl of corks, then only poked them every 5 minutes or so.
After 20 minutes of being dunked, the corks were ready for use. Instead of draining the solution and risking some bug or dust latching onto the corks as they dried, we left them bathing till we needed them, and we placed the bowl at the base of the corker for ease of access.
A floor corker is amazingly simple and complex at the same time. It’s physics and mechanics in action. You simply place a full bottle on the spring-loaded platform, place a sanitized cork in the jaws of the “compression chamber” or iris, then brace the corker with your foot (if it’s a rickety one like ours) and use your hands to pull down the handle. In one fluid motion, the cork gets squeezed on four sides and a metal rod comes down to plunge the compressed cork into the bottle. Check it out in the video below.
Once in a bottle, the cork has just enough room to expand in the bottle neck, creating a tight seal and keeping the wine in and oxygen out. Because any SO2 you added during the winemaking process is still bubbling out of the wine at this point, and because wine is a living thing that needs time to adjust to its new environment, you’ll want to place the bottles upright (cork side up) in the case for 24 to 48 hours. After the bottles de-gas and adapt, flip them upside down in the case or store them horizontally, either in a wine rack or simply by tilting a full case of bottles on its side—choose whichever method you’d like as long as it ensures that the wine is staying in contact with the cork (which could wither if you leave it hanging high and dry above the wine’s slight headspace, which you’ll notice when a bottle is standing upright).
Now your bottles are ready to be labeled and shared with friends (or hoarded—you know who you are). But don’t drink them right away—beware bottle-shock.
I’ll post details on how to label and the truth (it’s not a myth!) about bottle-shock soon. In the meantime, we’re gathering gift ideas for winemakers, wannabe winemakers, and wine fans in general. Cruise by next week to see what we unearth. And by all means, please leave your own ideas in our Comments section!
Last week, I told you how Team Wine sterilized dozens and dozens of Burgundy-style bottles with bottle wash, stuck them on a spiky plastic tree to dry, then started a siphon and began filling those bottles with wine—click to see the full details and even videos of how we set up and started a siphon.
Or just skip ahead and watch the below video, in which Sunset’s managing editor, Team Wine member Alan Phinney, uses a spring-loaded bottling rod attached to a siphoning tube to fill a bottle with Chardonnay. Toward the end of the video, you’ll get a glimpse of our creaky old floor corker as Team Wine’s Sara Jamison loads it up with a sterilized cork and places a full bottle on its spring-loaded platform.
On the recommendation of the experts at our local winemaking shop, MoreWine in Los Altos, California, we switched our cork choice from “First” quality 1 3/4-inch-long #9 corks to “Grade 3” ($36 for 100 corks). Why the quality switch? Well, white wines don’t keep for decades, and therefore we don’t plan to try cellaring them. So there was no need to pay for higher-quality corks—if we can afford them, we’ll use them next month on our Syrah, whose inky, fruity, bacony yumminess we will cellar and lusciously savor for years.
The 1 3/4-inch length is one of the two standard options (the other being the slightly shorter 1 1/2-inch length) for a traditional 750-ml. bottle. We used #9 (a sizing guideline that refers to the cork’s diameter and its resiliency under compression) because it’s the best width for sealing a bottle with a floor corker. Here’s a handy chart (click that link, then scroll all the way down) that shows different cork sizes and their recommended uses (like a #8 if you’re using a hand corker, and a #7 if you’re bottling a split).
Our all-natural corks were punched from cork trees in Portugal. We didn’t choose plastic or “agglomerated” (bits of cork pressed together and bound with an epoxy). We got the good stuff.
But even though they’re natural, corks still need sterilizing before being put in contact with wine (which remains alive, even when bottled). So Sara J. and I prepped another sanitizing solution of water and potassium metabisulfite (the exact equation is in our free downloadable how-to guide) in a nonreactive stainless steel bowl. To keep the corks from bobbing up in this solution (and to keep us from having to constantly jab them down to ensure sterilization) we nestled a smaller nonreactive bowl on top of the bowl of corks, then only poked them every 5 minutes or so.
After 20 minutes of being dunked, the corks were ready for use. Instead of draining the solution and risking some bug or dust latching onto the corks as they dried, we left them bathing till we needed them, and we placed the bowl at the base of the corker for ease of access.
A floor corker is amazingly simple and complex at the same time. It’s physics and mechanics in action. You simply place a full bottle on the spring-loaded platform, place a sanitized cork in the jaws of the “compression chamber” or iris, then brace the corker with your foot (if it’s a rickety one like ours) and use your hands to pull down the handle. In one fluid motion, the cork gets squeezed on four sides and a metal rod comes down to plunge the compressed cork into the bottle. Check it out in the video below.
Once in a bottle, the cork has just enough room to expand in the bottle neck, creating a tight seal and keeping the wine in and oxygen out. Because any SO2 you added during the winemaking process is still bubbling out of the wine at this point, and because wine is a living thing that needs time to adjust to its new environment, you’ll want to place the bottles upright (cork side up) in the case for 24 to 48 hours. After the bottles de-gas and adapt, flip them upside down in the case or store them horizontally, either in a wine rack or simply by tilting a full case of bottles on its side—choose whichever method you’d like as long as it ensures that the wine is staying in contact with the cork (which could wither if you leave it hanging high and dry above the wine’s slight headspace, which you’ll notice when a bottle is standing upright).
Now your bottles are ready to be labeled and shared with friends (or hoarded—you know who you are). But don’t drink them right away—beware bottle-shock.
I’ll post details on how to label and the truth (it’s not a myth!) about bottle-shock soon. In the meantime, we’re gathering gift ideas for winemakers, wannabe winemakers, and wine fans in general. Cruise by next week to see what we unearth. And by all means, please leave your own ideas in our Comments section!
Keep Reading:
The Latest
