New project for a new year: Display your favorite images of loved ones for the most personal gallery wall of all
Fletcher Rhodes, original photo on Houzz
Written byhouzz
November 1, 2017
Share this story
Fletcher Rhodes, original photo on Houzz
In the digital photo age, not only do most of us have cameras on us at all times, but we have printers that can turn them from pixels into paper. There’s been no formal study I can find, but it only stands to reason that people have more photographs of friends and family in their possession now than at any other time in history.
How to display them? Interior designer Emily Mughannam of EM Design Interiors in Sonoma, California, says technology may change, but the desire to surround ourselves with family images seems to stay the same. “An interior should tell a story,” she says. “A photo wall can show us where we have been and where we are going. Frankly, when I’m in a home without one, it can feel a little sterile.” Whether you choose to do it yourself or hire a professional, once the photos are 2-D, the process of creating a photo wall can be decidedly low tech.
Why: Crookedly hanging a haphazard collection of random family photos is akin to spreading the contents of your junk drawer across the wall. A little thought can make a photo wall a work of art.
Who to hire: Although it’s a project that could lend itself to a DIY weekend, you can get a polished look with the help of an interior designer or a professional art hanger. If you want to resize, reprint or change the color of a large number of photographs, a photography lab can make quick work of it. You might also consider using the services of a professional framer.
Basic steps: Decide where you want your photo wall. “Because they do tend to look busy, I like to locate them in more private spaces, such as a hallway or bedroom,” says Mughannam.
Next decide whether you want a grid or an asymmetrical display. No matter which you choose, Mughannam says uniting the pictures through a common element will give them a sense of order. That common element could be photograph color, frame color or image size. For example, you could have a lot of photos of different sizes together on a wall if they are all black and white.
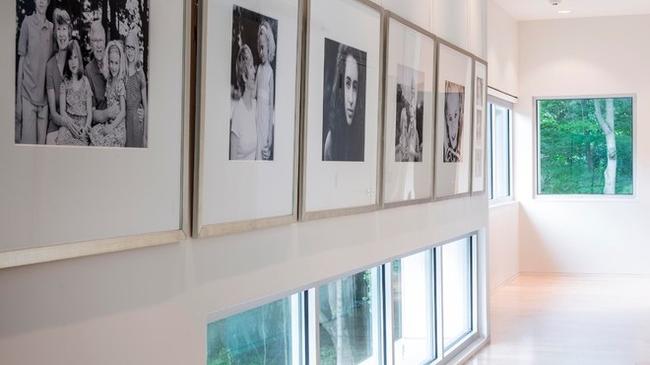
In this project from David Rausch Studio in Zionsville, Indiana, black and white family photos framed in the same scale and grid pattern as the nearby windows make a big architectural statement.
How: To avoid having to constantly make room for more photos, and to create an instantly finished look, Mughannam will create a display using frames whose contents can be easily changed. “I hang all of the frames the family wants to use, even if I have to insert a landscape photo as a placeholder,” says Mughannam. “As the family grows and changes, they can add or swap out photos.”
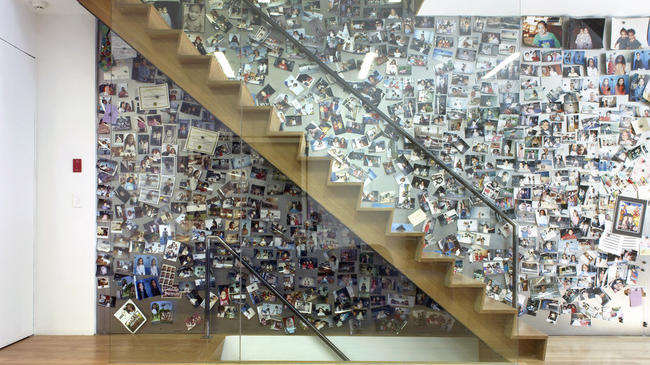
The architects at Slade Architecture in New York gave a family the ability to display a large number of photos in an asymmetrical display by lining a stair wall in metal, which allows the photos to be attached by magnets. The fact that they are all color images brings them together and makes a very personal work of abstract art.
Mughannam has achieved similar results with magnetic paint, a primer with very fine iron particles that allows lightweight magnets to stick to the wall after the topcoat is applied. “This kind of paint can be tricky for homeowners to apply, because it takes many, many coats,” says Mughannam. “If you are doing it yourself, it is easier to deal with if you apply to a board and hang that on the wall.”
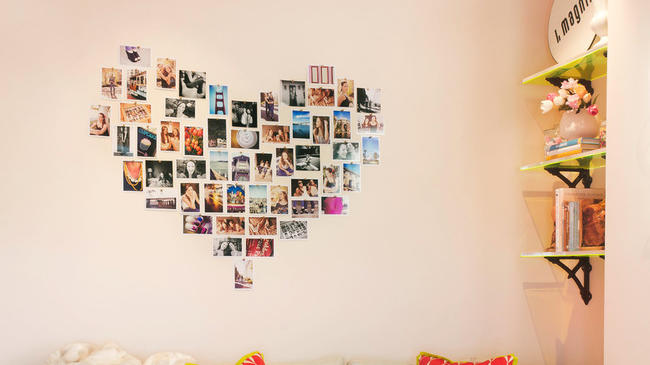
For this room in a San Francisco decorators’ showcase, Mughannam created a sweet asymmetrical display by using cool thumbtacks to affix pics directly to the wall in a heart shape. “The idea was that it was a room for a teenager. I thought that a teen would enjoy the ability to frequently and easily change her photos,” she says. “These days there are so many high-design thumbtacks on the market, it makes it easy to make a cool project where the tacks become part of the art.”
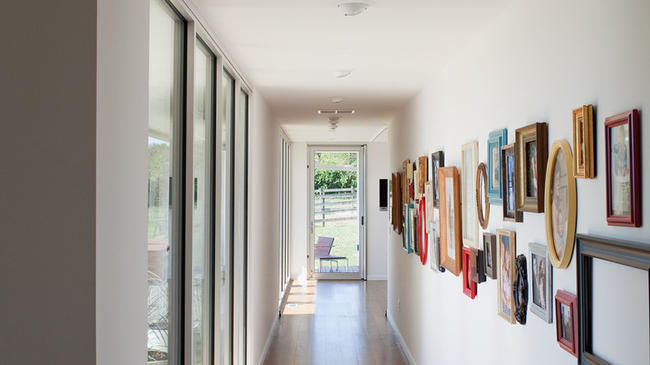
Although Mughannam personally likes to use frames of the same color and size, she says it’s not the only option. “You can certainly hang a collection of vintage frames,” she says. “But I think it looks best if they are all the same distance apart.”
This photo wall, by Hufft Projects, for a home in Kansas City, Missouri, includes a wide variety of frames, but it has discipline because the outermost edges are aligned and the frames are spaced equidistantly.
Cost: Mughannam says a DIY installation can cost $300. A larger installation involving reprinting photos and having them professionally framed and hung could cost as much as $3,000 or more.
Typical project length: Creating your own photo wall could be done in a weekend. To have photos professionally printed, framed and hung could take several weeks.
More: “When I hang photos myself, I use an easy trick,” says Mughannam. “I arrange the photos on a big sheet of kraft paper. When I have them as I want them, I trace them. I tape the paper to the wall with painter’s tape and use a nail to mark the spot where I want to place my hangers. I take the paper down and nail the hangers into the wall. It works great!”