Build a wood top and use a pair of ceramic pots for legs. Get the complete step-by-step
Thomas J. Story
New Zealand flax enlivens the redwood bench perched on large ceramic pots.
Written byPeter O. Whiteley
December 2, 2008
Share this story
The hardest part of building a wood bench is ensuring that its legs are sturdy and well attached.
So to make it easy to build this 10-foot-long bench, we designed a bench top that rests on a pair of oversize ceramic pots.
Add plants or trees to enrich the look; we used New Zealand flax.
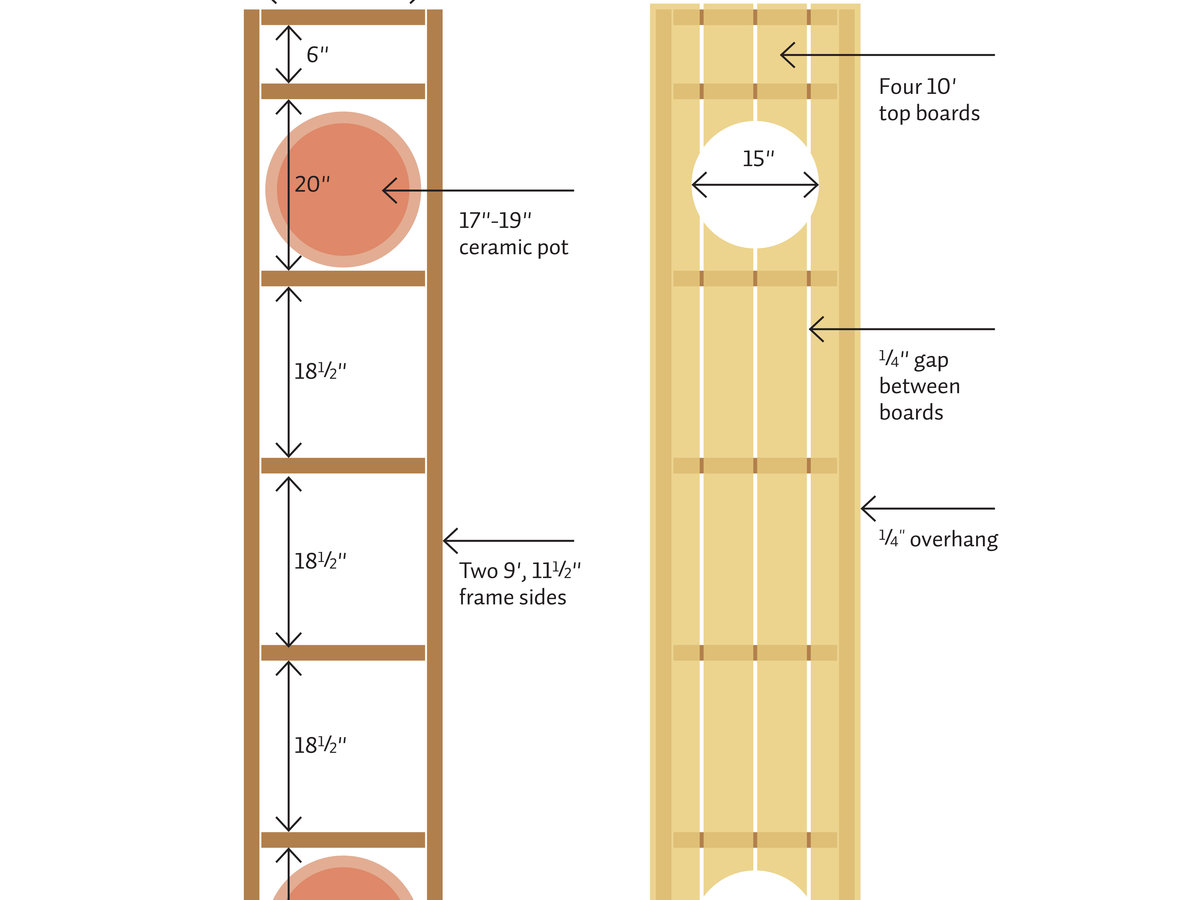
The bench frame and top are made of 2-by-6 decking. (Seek sustainable choices.) For a comfortable seating height, choose pots that are about 18 inches tall and wide (no wider than 19 inches for this bench).
Look for thick-walled, wide-lipped pots that have been high-fired and glazed; avoid unfired terra-cotta. For safety, lift bench top periodically and check pots for cracks.
The cost of the project is about $300, depending on the type of wood and pots.
Tools
Electric drill
Tape measure
Electric sander
Pencil and scissors
Saber saw
Paintbrush
Materials
Four 10-ft. 2-by-6s
Two 9-ft., 11½-in. 2-by-6s
Eight 19¼-in. 2-by-6s
2 lbs. 3-in. deck screws
Medium-grit sandpaper
Two very sturdy ceramic pots
Heavy paper or scrap cardboard
Deck stain/sealer (we used the Flood Company’s CWF-UltraLast, www.flood.com or 800/321-3444)
How to make the planter bench
Following the diagram at left (click the thumbnail below the top image), build the bench’s ladder-like frame, countersinking all screws.
Sand the frame. Space the 10-foot lengths and screw to the frame so the edges overhang ¼ inch on all sides.
Measure the inside diameter of one pot (ours is just under 17 in.). On a piece of heavy paper or scrap cardboard, draw and cut out a circle that is 2 inches less in diameter.
With a helper, place pots under appropriate section of the bench top, as you carefully lower top onto pots. Center the cutout circle over each pot and trace its outline.
Cut out each circle using the saber saw. Sand the cut sides and bench top, then use the paintbrush to seal wood with a deck stain/sealer.
Place the pots in their desired location and position bench top before filling pots with soil. Add plantings through the cutouts.


