See how to makeover a dresser, redo a side table, refresh frames, paint candlesticks, and reupholster a chair
Rob D. Brodman
To remake the dresser we used: Black (2132-10) paint from Benjamin Moore Paints; 800/672-4686. Toasty Grey (formula 30YY 51/098) paint from Glidden; 800/454-3336. Mission-style 1¼-inch square oak knobs ($7 each) from Bauerware Cabinet Hardware;
Written byJess Chamberlain
April 7, 2008
Share this story
FRESH TAKE: DRESSER Go dark and dramatic
To bring this dresser into the modern era, we first removed and set aside the drawers and wheeled feet. Next we removed and discarded the top trim piece and the drawer pulls. We smoothed out the bottom trim’s frillier details with wood filler. Once it was dry, we used 220-grit sandpaper and an electric sander (rented from a hardware store) to lightly sand all visible flat surfaces. We hand-sanded grooves and detailing, then wiped all surfaces with a damp cloth. With a 6-inch paint roller, we applied two coats of low-sheen black latex enamel paint to all visible surfaces, using long strokes in one direction (we used a 2-inch paint roller for the corners and edging). When that was dry, we applied the gray paint accents.
After the last coat of black paint is completely dry (a day or two is ideal), plan your design on paper.
Remove the dresser drawers and knobs, and position drawers on a covered floor surface, lining them face up in the same sequence as they sit in the dresser (number them on the inside with a pencil).
Adhere strips of 1-inch-wide painter’s tape (we like Frogtape; find stores at the website) flush with the outside edge of the two smaller top drawers. Next, adhere ½-inch-wide painter’s tape flush with the inside edge of the 1-inch tape. Repeat with the 1-inch tape on the inside edge of the ½-inch tape. Remove ½-inch tape.
Use this same wide-narrow-wide tape application for the design on the three lower drawers. To ensure that the corners meet at 90° angles, use a corner ruler edge when applying tape. Apply pressure to inside edges of tape strips.
Apply two coats of gray paint with a 2-inch dense-foam roller, allowing time to dry between coats. Once completely dry, carefully remove tape, secure knobs, and reposition drawers in the dresser. Use a ¼-inch paintbrush and the gray paint to carefully fill in any gaps between the drawers.
For the new wooden drawer pulls, we applied two coats of black or gray paint to each. Once they were dry, we reattached them, along with the old wheels.
• $ 25 Craigslist find • FINAL COST: $124
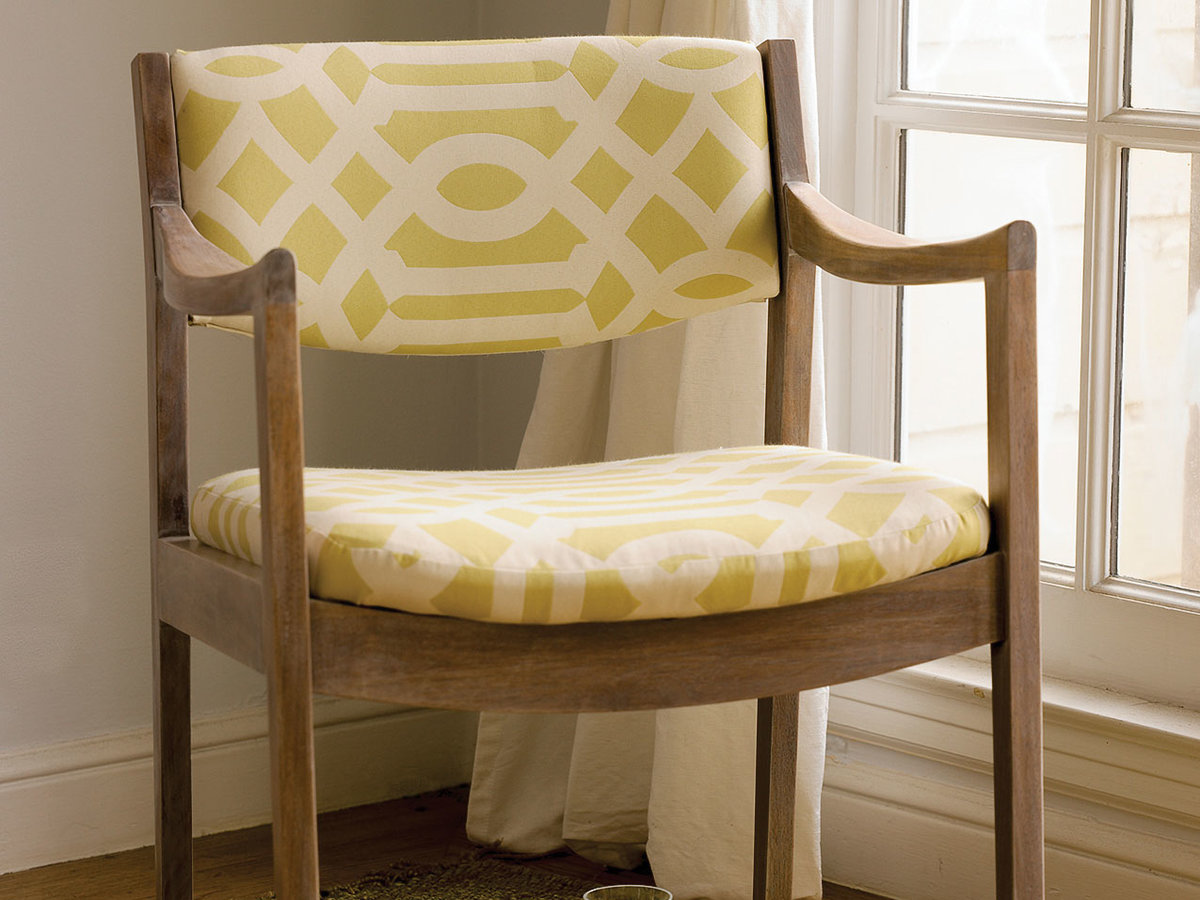
FRESH TAKE: SIDE CHAIR Add eye-grabbing upholstery
Our first step was to remove and set aside the cushions, saving all hardware. Following product instructions, we applied paint stripper with a paintbrush. Next we removed the varnish and stripper with a nonreactive putty knife and scrubbing pad and applied a stripping solvent to the wood frame with a rag. Once it was dry, we brushed on wood dye, first with a paintbrush, then by rubbing with a clean cloth to even it out. After letting it dry, we applied a light coat of water-based polyurethane satin varnish. Finally, we took the frame, cushions, and ¾yard of fabric to an upholstery shop, where the cushions were reupholstered and reattached.
DIY and save Giving a chair a new seat is simple and satisfying. All you need is fabric, a staple gun, a screwdriver, and an afternoon. (But avoid this rookie mistake: Don’t misplace the hardware when you take the chair apart. You’ll need it to put the chair back together.)
DIY reupholstery of a chair back is trickier. If you’re a pro with a sewing machine, your best bet is to dismantle the fabric on the original cushion and use it as your pattern. Baffled by bobbins? Try this no-sew guerrilla upholstery method. After you’ve unscrewed the back cushion, cut a piece of fabric large enough to wrap around the front and sides; secure it by stapling it to the back. (Give yourself about 2 inches of margin to secure the fabric.)
Now you need to cover up the staples and ragged fabric edges. The no-sew solution? A glued-on panel of fabric. Cut a piece of fabric ¾-inch wider on all sides than the back of the cushion. Turn under 1 inch of fabric on all sides and iron flat. (Neatness counts; this is the part you’ll see.)
Carefully apply fabric glue to the flap. Leaving a ¼-inch margin, glue the panel of fabric to the back of the cushion, hiding the staples.
• $12 Craigslist find • FINAL COST: $61 for the chair and supplies, plus about $165 if you outsource the upholstering
Picking an eye-grabbing fabric for the upholstery instantly updated the piece.
To redo the chair we used: Liberon Palette Water-Based Wood Dye available from Kingdom Restorations, 800/344-9257. Citristrip stripping gel and paint stripper afterwash, 800/398-3892. Sunshine Tango upholstery fabric ($19 per yard) from Britex Fabrics, San Francisco; www.britexfabrics.com, 415/392-2910.
FRESH TAKE: CANDLESTICKS Try an unconventional hue
We loved the elegant shapes of these tall candlesticks and wanted to update and unify them with a bold and unexpected color ― in this case, high-gloss indigo. We started by removing all wax residue with paint thinner and a clean cloth. Then we misted one coat of spray paint primer for metal onto the candlesticks, holding the can 10 to 12 inches away and being sure to cover evenly with paint. Once they were dry, we sprayed two light coats of spray paint for metal, again being sure to hold the can at a distance (to avoid drips) and to cover the detail grooves evenly.
• $15 Craigslist find • FINAL COST: $26
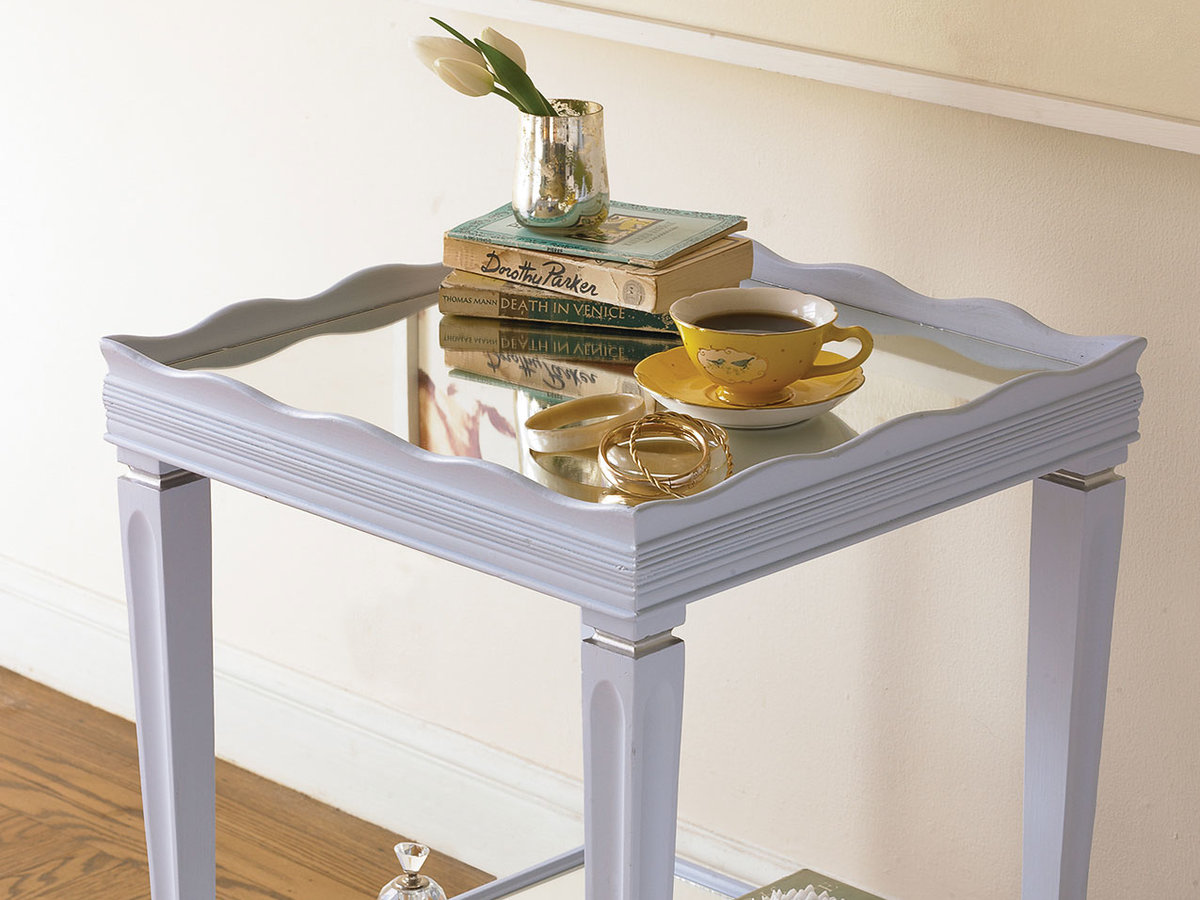
FRESH TAKE: SIDE TABLE Use mirrors and paint
We started by sanding with a 220-grit sandpaper sponge and used a damp cloth to remove all residue. Then, so the dark wood wouldn’t show through our light paint, we covered the table with one coat of spray paint primer. With a 1½-inch angled synthetic-bristle brush, we applied two coats of satin latex paint to the entire table (the bottom of the tabletop, too, to accommodate the reflection from the lower mirror). Once it was dry, we used liquid silver leaf to accent the feet and the grooves near the top of the legs. Finally, after measuring both surfaces, we had two pieces of ⅛ -inch-thick mirrored glass custom-cut (and the corners of the lower piece sanded ⅛-inch to account for the tapered legs) at a glass store, and laid them in place. Tip: For easy cleanup of spills, don’t glue down the mirrors.
Two mirrors, some paint, and liquid silver leaf were all that was needed to bring some style to this side table.
FRESH TAKE: FRAMES Create a common palette
We began by deciding which digital photos we’d use for each frame, then we mapped out how we’d arrange them on a wall. (This dictated which paint color we’d use for each.) Next we removed the mats and glass, lightly sanded any sheen off the wood with 220-grit sandpaper, and removed the residue with a damp cloth. Using 2-ounce (sample-size) jars of paint in five colors, we painted the frames, sometimes layering colors.
Once the frames were dry, we took them to a framing shop and bought precut mats in a single color. Finally, we printed our photos in black-and-white, placed them in the frames, and mounted the frames on the wall.


