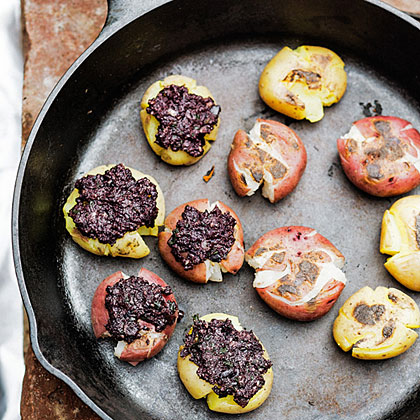
"Smashing the potatoes gives you more surface to caramelize," says Napa Valley chef Michael Chiarello. "And you can spread the tapenade evenly, so you get seasoning in every bite." To make these on a gas grill, preheat the skillet over medium-high heat, then cook as directed.

Make pesto: Purée garlic and basil in a food processor. Add olives and oil and pulse to a smooth, thick paste. Turn into a bowl and stir in cheese.
Put potatoes in a large pot on the stove with generously salted water to cover. Bring almost to a boil and cook until easily pierced with a knife, 15 to 20 minutes. Drain. When cool enough to handle, press each between your hands until about 3/4 in. thick but still in one piece.
Build a fire and let burn to ashy chunks (see "The DIY Firepit," below).
Spread each potato with 1 heaping tbsp. pesto and press to compact it. Heat a cast-iron skillet, then add potatoes. Pan-roast until crisp underneath, 5 minutes. Turn pesto side down and let roast and crisp up. "Roasting the pesto adds umami to the potatoes and an interesting toastiness." Put on a platter, pesto side up, and sprinkle with parsley.
Make ahead: Potatoes and pesto, up to 2 days, chilled and covered.
The DIY Firepit
"You can do anything on this. It's a little like camping in the middle of your day," says Napa Valley chef Michael Chiarello. All you need is bricks arranged to fit under your cooking grate and some sand.
Build the pit: Spread a double layer of heavy-duty foil on the ground ("not grass," warns Chiarello, since it may scorch). Make it big enough to extend a foot beyond your cooking grate in all directions. Build a brick rectangle 3 layers high, leaving a couple of bricks out of the top layer on opposite sides, to encourage airflow. (For a standard 21-in. round Weber grate, the rectangle should be 2 bricks by 3 bricks.) Fill with about an inch of sand.
Light the fire: Put several balled-up sheets of newspaper in the center and position kindling into a tipi around it; lean larger kindling and then 5 to 6 small logs (preferably oak). Light the fire. "The tipi lets every bit of flame go up past 3 or 4 logs," says Chiarello, so the fire starts fast. Once the logs have caught, add several larger logs to the perimeter. Let them burn down to ashy chunks with low flames (1 1/2 to 2 hours). Because there's less smoke and char than cooking over a flaming fire, Chiarello says, "it makes your food taste much cleaner, gives nuanced flavor, and is better for wine."
Start cooking: Keep another log burning at the back of the pit. When it's ashy chunks, rake it into the main fire to maintain heat.
Servings 0
* Percent Daily Values are based on a 2,000 calorie diet. Your daily value may be higher or lower depending on your calorie needs.