Succulent Candle Holders: Make Any Table Special
If you love succulents as much as we do at Potted, then you'll love this workshop we just did with Linda Estrin of Succulent Floral Arts....
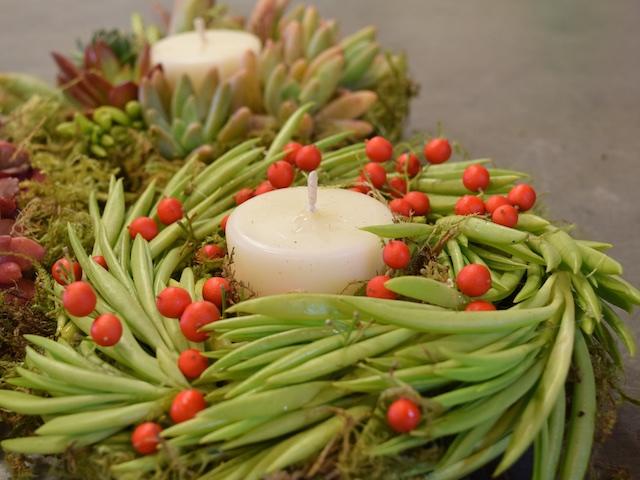
Succulent Candle Holder

If you love succulents as much as we do at Potted, then you’ll love this workshop we just did with Linda Estrin of Succulent Floral Arts. They’re super easy to make.

First, you want to get a base. Plant saucers or even tea cup saucers work great.
Next, cover the bottom with glue to create a firm base of sphagnum moss, leaving a space in the center for your candle. The moss makes a wonderful base for the succulents to thrive without ever needing any soil. Sphagnum moss is easily available in any home center or nursery.

Linda recommends Aleene’s Tacky Glue, available at most craft stores like Joann’s or Michael’s. This glue dries quickly, totally clear and is non-toxic to plants and animals. Really good for air plants too.

Now you want to gather your succulent cuttings. Here’s a great opportunity to get trimmings from your garden (or maybe your neighbor’s garden.. but ask first!). Linda gave each of the participants in the workshop this lovely tissue filled selection. Some of these were from her grandmother’s garden. Do make sure to choose varieties that grow on a lower level though, like echeverias or sedum. This way your creation will have a longer life span.

Trim the stems off the bottom of your cuttings. It will be easier to glue them onto the sphagnum moss this way and give them a better chance to stick.

Squeeze out a generous portion of glue. It won’t hurt the plant.

Begin with your design. You can mix everything up, choose to use one color, go heavy on one side and light on the other… this is where you can have fun.

Having a good variety of cuttings gives you a lot of creative freedom. Place each one firmly into place until you get the effect you’re looking for. But don’t worry, if you don’t like it, it’s not that hard to pull apart and start again. Another beauty of using sphagnum moss.


You’re done! The succulents will continue to grow in the sphagnum moss (as long as you give them a good misting every 10 days or so) to the point where you’ll probably have to trim them. You can even just pull the whole thing off the saucer and plant it in a pot or the ground when you no longer want the candleholder.

Linda also suggested adding little extra bits, like small ornaments, holly or dried flowers to give your creation a little extra zing and make it more festive. When the holiday is over, you can easily remove the decorations.

And there you have it: super easy succulent candle holders you will love to make and use. And if you’re worried about the open flame, you can also try the battery operated varieties. They are making them now with real wax and they flicker just like the real thing.
How would you make yours?
