It’s Alive
Here's what went into our beer: Hops (the green flowers in front); yeast (in the vial); and bags of malted (i.e. sprouted) wheat and bar...
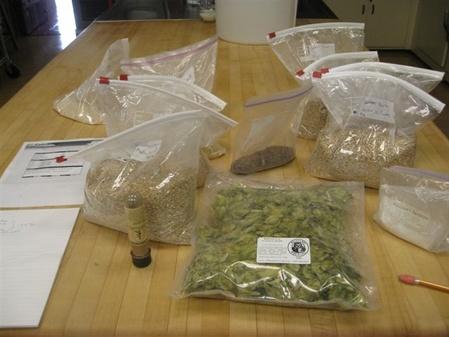

Here’s what went into our beer: Hops (the green flowers in front); yeast (in the vial); and bags of malted (i.e. sprouted) wheat and barley. The dark bag in the center is Irish moss, a seaweed, to help cleanse the brew of cloudy proteins; the white powder in the right foreground is food-grade gypsum, to harden the water.
WILL A YEAR’S WORTH OF EFFORT PAY OFF?
Last weekend, Team Beer (Editorial Services Coordinator Stephanie Dean, Managing Editor Alan Phinney, brewing genius Chuck Schwalbach—husband of our Manufacturing Associate Manager, Diane Schwalbach—and yours truly) finally brewed the beer we have been formulating for the past year for our one-block feasts. Oh, and one innocent bystander, Food Editor Margo True.
From planting wheat, barley, and hops last spring to harvesting the grains, threshing and malting them, and then, several days ago, to boiling them with the hops, we are almost home.
The part of this process that brought the most procrastination was the threshing (loosening the seed from the scaly chaff) and winnowing (removing the seed from the chaff). We actually ended up with only 3 pounds of grain, but any more than that and we would have been on disability with eye strain and hand cramps.
Chuck, unlike the rest of the team, had experience in making beer from grain (rather than from extracts sold as part of a beer-making kit), so he was our savior with his knowledge and all of his equipment (two converted Gatorade coolers, a large stockpot with a spigot, and a chilling unit, purchased from San Francisco BrewCraft and MoreBeer.com.
The total amount of grain we malted: about 9.5 pounds of barley and 6 pounds of wheat. We decided to use Belgium Abbey yeast because it tends to be more tolerant of high alcohol, and not knowing how effective we’d been with the malting process, we wanted to be prepared. (If the grains had fully malted, they’d yield lots of sugars–the food for fermentation.)
Chuck, a mechanical engineer for Apple, brought his laptop and used a program designed for brewing with grain, so everything was down to a science.


Left: Chuck with his gear (one of the stockpots is mine; the rest is his). Right: Chuck’s cool calculations.
HOW WE MADE BEER FROM GRAIN
1. Mashing. We heated up a big metal stockpot filled with water (1 quart for each pound of grain) and then poured it into one of Chuck’s converted Gatorade coolers, the one fitted with a mesh bottom to keep the grains from clogging the spigot. Once we got it to the specific temperature needed (172° F), we added our grain and mixed well.

Stirring the grains.At this point the mash temperature decreased to 152 degrees. This is the ideal temperature for grain to convert its starches to sugar for fermentation. A series of chemical changes take place at this time, and if I could fully understand them, my head would explode.
We held the mash for 90 minutes, which was enough time for the conversion to take place.
2. Sparging. Toward the end of the mashing, Chuck heated up another giant stockpot of water, added some food-grade gypsum (which hardens the water and forces proteins to drop out, so they don’t cloud the beer), and hoisted it up on top of a tall stove so it would be elevated. He attached tubing to its spigot and let the water (also 172° F) flow down into a sparger—a water-dispenser—set over the mash pot. The point of sparging, as this process is called, is to rinse off the residual sugar that adheres to the grain during the mash. We sparged the grain for about 20 minutes.


Left: Hot water flows into the sparger, the space-station lookalike set over the mash pot. Right: The sparger dispenses water through its central tube very evenly and slowly, keeping the water level constant.
At the same time, we attached tubing to the mash pot’s spigot and let the wort—the sweet brown liquid now full of grain extract—flow into the first, now empty stockpot.


Left: Hot water on top, sparger and mash in the middle, and wort below. Above: Fresh wort.
3. Boiling.The wort now had to boil for 90 minutes. During the boil, we added whole hops at various stages to impart flavor and aroma. (This particular hop is known for its woody fragrance).We used a variety called Fuggle, which we had to buy because our own Nuggethops, being weak as is typical in the first year of growth, gotattacked by fungus and bugs.

Fuggle hops boiling with the wort.4. Chilling and flowing into the primary fermenter.
After the required boiling period, Chuck brought out the Porsche of all cooling devices: a wort plate chiller.

We attached a hose carrying regular tap water to the water inlet side of the chiller and put the outlet hose in the kitchen sink to drain. Then we attached a second hose to the boiling pot to carry the hot wort to the chiller; from the chiller, the cooled wort flowed through a second outlet hose into a 5-gallon plastic pail (the primary fermenter). We put the yeast in when the pail was halfway full.


Left: The boiling pot, elevated so that the wort will flow easily downward into the chiller and then the fermenting vessel at Chuck’s feet. Right: the fermenting vessel (3 seconds ago, it filled up with cooled wort from the chiller; Chuck just disconnected the hose).
It absolutely amazed me that the wort went in at boiling temperature and exited at 70 degrees within seconds. This device saves so much time in the cooling process. With an immersion chiller, it takes anywhere from 30 minutes to an hour. With this thing, you can pitch yeast (i.e. add it to the wort) immediately, which helps expedite the fermentation process.
5. The verdict.With the wort and yeast now in the fermentation vessel, Chuck took out a sample of it and a hydrometer and measured the specific gravity of the mix (its density relative to the density of water; in brewing, it indicates the amount of sugar) to see what kind of potential we had for it to turn into beer. It looked light in color so we wondered about it. Wort made from malt extract (rather than malted grain) is usually darker. “It’s probably about 7%,” said Chuck. Looks like our malting worked!

Chuck measures the wort’s specific gravity.

Of course we had to all have a taste (I’m on the left).The wort had a grainy, sweet flavor, with a little bit of bitterness and some wood on the nose (probably coming from the hops that we used).
Now all we had to do was let the microbes do their work. We put an airlock on the fermentation vessel, covered it with a tablecloth, and put it in a quiet corner.

Fermentation didn’t take place right away. But then, last Monday afternoon, the airlock started foaming wildly. Fermentation! It is such a sweet and victorious smell when you stick your nose over the airlock and realize that finally all of your labor has reaped a reward.
This first aggressive fermentation, called the primary, will dissipate within a few days and settle into a slow methodical rhythm. I will rack (move the beer from one container to another) several times before we bottle. The racking helps to clear the beer through gravity and also frees it from all of the trub (sediment that accumulates at the bottom of the fermenter).
We’ll keep you updated.
By Rick LaFrentz, Beerless Leader
