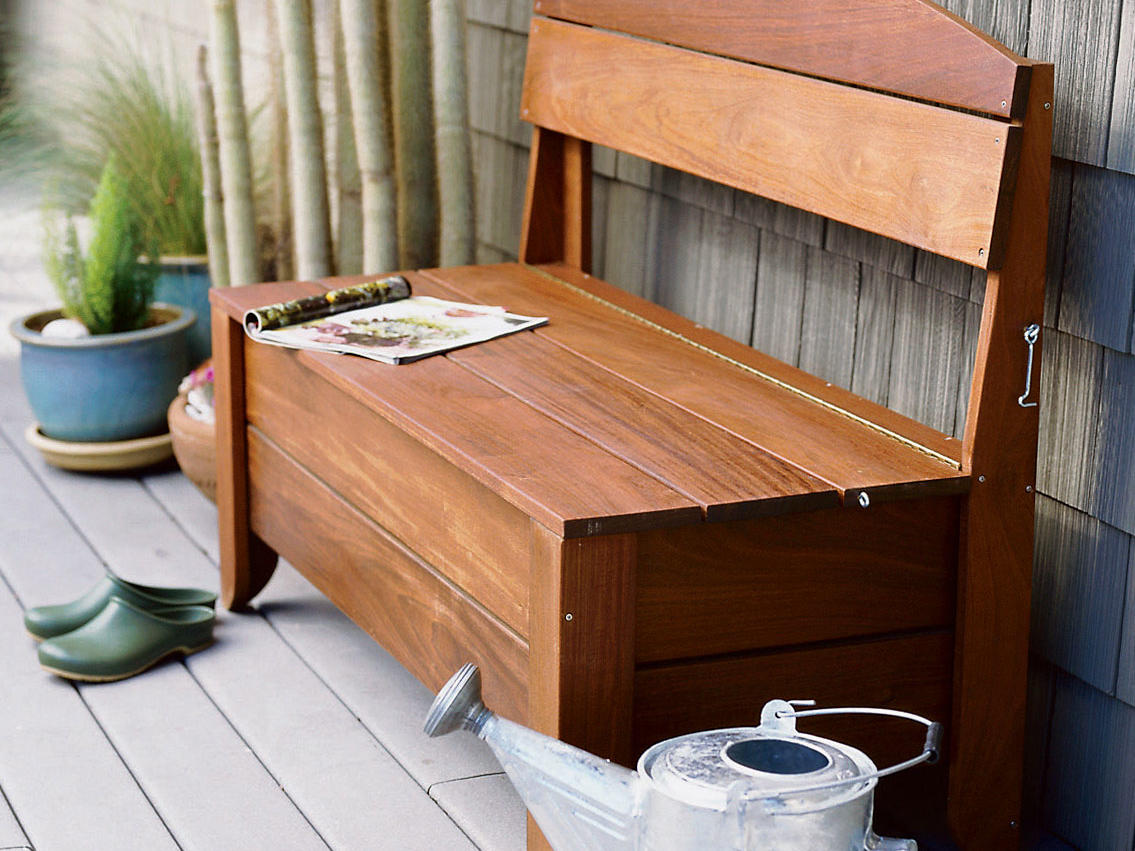
Handsome Bench Hides a Hose
Make it in two days for under $200
James Carrier
A coiled hose is a necessary evil in a garden—you need one, but when it’s not in use, who wants to see it?
Instead, you can store one or two hoses in this handsome bench. It’s built from 1-by-6 boards; we used ipé, a rot-resistant tropical hardwood, but you could choose cedar, redwood, or teak for natural beauty and durability.
The key parts of the bench are the front and back legs—both have mitered corner joints and rounded bottoms.
The rear supports are tapered in front to form a comfortably angled backrest. The top is held open with a hook and eye.
The project, which requires intermediate woodworking skills, takes about two days to complete and should cost less than $200.
How to Build a Hose Bench
TOOLS
- Table saw
- Combination square
- Tape measure
- Pencil
- Circular saw
- Saber saw
- Yardstick
- Two C-clamps
- Electric drill and bits
- Phillips-head screwdriver
- Hacksaw
- String
MATERIALS
- 7 8-ft.-long 1-by-6s
- Wood glue
- 30 2-in. square-drive trimhead screws
- 60 1¼-in. deck screws
- 48-in. continuous hinge
- 4 ft. of 24-in.-wide ¼-in. galvanized wire mesh
- 20 ¾-in. trusshead screws
- Wood sealer
- 3½-in. hook and eye
DIRECTIONS
Conceptually, this project is like building a toy chest with corner guards that serve as legs; the rear legs are taller to support the backrest.
1. Start by making the legs: Set the blade of the table saw at 45° and rip (cut lengthwise) one board in half. From each half, use the circular saw to cut two 16-inch and two 32-inch lengths.
2. Draw identical arcs at the base of each leg (we traced a 1-qt. paint can to make ours), so each arc bottom ends at the miter joint; cut with saber saw.
3. On what will be the side pieces (or backrest) of each back leg, draw the tapered front edge (see lower left drawing), making sure the left and right legs mirror each other; cut with circular saw.
4. Assemble legs: Use clamps, wood glue, and countersunk trimhead screws (at about 5-in. intervals).
5. Cut from the remaining 1-by-6s:
- 4 at 44 inches ( A boards)
- 4 at 16¾ inches ( B boards; leftover 29-in. length will be cut into F boards)
- 6 at 46 inches (5 C boards, plus D and E boards)
6. Rip one 46-inch length into one 2½-inch-wide piece ( D board) and three ¾-inch-wide lengths ( E boards; one will be cut into two pieces for four total E boards). Also rip the leftover B-board piece into two 2½-inch-wide lengths and cut one into two 14½-inch lengths (F boards).
7. Attach A boards, spaced ½ inch apart, to inside of front and back legs with deck screws (two per end). Drill (or cut) a 1½-inch-wide circle in lower rear A board.
8. Add B boards to join front and back assemblies; attach with deck screws. Along the lower inside edges of A and B boards, use deck screws to attach E boards that have been cut to fit; they’ll support the wire-mesh bottom.
9. Cut D to fit between rear legs and rest on top of upper back A board; attach with trimhead screws. Use hacksaw to cut continuous hinge to the same length.
10. Using the pencil and string, make curve for the top backrest board: Sketch an arc with a 7-foot radius on a C board (the arc should start and end 2½ in. above the board’s bottom corners), then cut with a saber saw.
11. Use trimhead screws to attach one regular C board and the curved C board to make backrest.
12. Assemble bench seat from remaining three C boards and the F boards, attached with deck screws. Center and attach hinge to the seat’s inside back edge (a C board), then attach the assembly to the front edge of D.
13. Cut wire mesh to fit. Attach it to top of E boards with trusshead screws.
14. Seal wood. Attach hook and eye.