
An Easy Azalea Bonsai
Make your own bonsai in no time
Norman A. Plate
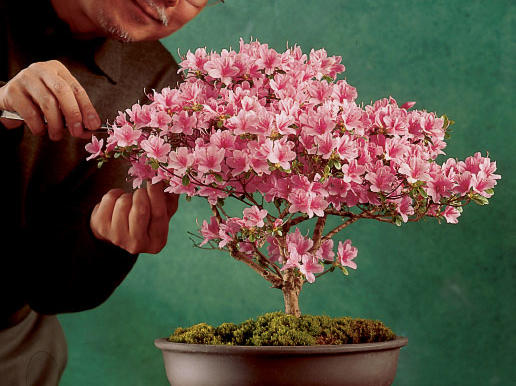
This remarkable Kurume azalea bonsai, created by Sunset associate art director Dennis Leong, is just five years old. Leong started it by pruning the canopy of a small azalea to a miniature tree shape. Then he pruned the roots and secured the plant in a bonsai dish.
Kurume and Satsuki azalea hybrids make the best bonsais. They’re easy to train; wherever you make a cut, they’ll sprout new growth. Bonsai supplies are available at most retail nurseries.
TIME: About 2 hours
COST: $50-$65
TOOLS AND MATERIALS
• Wire cutters
• 6-inch-square piece of plastic mesh screen
• Bonsai dish (Leong’s is 11 inches long by 61/2 inches wide)
• 24-gauge copper wire
• Four sturdy wood matchsticks or 2-inch-long pieces of 1/8-inch-thick wood
• Potting soil
• An azalea
• Pruners and spray bottle
• Chopstick
• Moss spores
DIRECTIONS
1. Cut two 2-inch-square pieces of plastic mesh and lay one over each drainage hole on the inside of the bonsai dish. For each piece of mesh, make two loops in a 4-inch-long piece of wire and slip ends through the mesh and drainage hole. Turn the pot over and bend the wire outward.
2. Cut heads off the matchsticks. Cut two 20-inch lengths of wire and wind each wire six times around a matchstick at the wire’s center point.
3. Cut two 3-inch-long pieces of wire and bend in half. Attach a wired matchstick to the inside of each drainage hole by placing another matchstick on the outside of the drainage hole and slipping the ends of the short wire over the wired matchstick, through the mesh and the hole, and around the outer matchstick.
Twist ends tightly. Fill the dish partway with potting soil.
4. Remove the azalea from the pot (D). Prune to thin out the top growth to make the plant’s structure more open and to form a tree shape.
5. Carefully tease the soil away from the roots and gently untangle them; mist the roots frequently with water while working.
6. Cut off two-thirds of the roots, flattening the bottom of the rootball and rounding the sides to decrease its diameter–the pruned roots should cover about two-thirds of the surface area of the bonsai dish. Position the base of the plant in the dish just off-center. Add soil to hold the rootball in place, working it in around the roots with the chopstick.
7. Cut two 3/4-inch-wide by 4-inch-long strips from the remaining screen. Lay a strip across each side of the rootball. Run an anchoring wire through the ends of both screens, then tightly twist the wire ends across the mesh to firmly hold the rootball in place. Clip off the excess wire.
8. Finish filling the pot with soil. Water well. Sprinkle moss spores over the soil surface, and mist regularly with water.